About The Home Screen
The Home Screen is the initial screen displayed when Gemstone is opened. The Home Screen can also be accessed directly from the Editor.
To view the Home Screen from the Editor:
- Click the Home Screen icon
 above the toolbar to the left of the Editor.
To return to the Editor, click the Home Screen's Back to images button.
From the Home Screen, new projects can be started, or pre-existing projects continued.
The Home Screen consists of three panes:
- The Create a New File pane,
- The Template/Presets pane, and
- The Previous Projects pane.
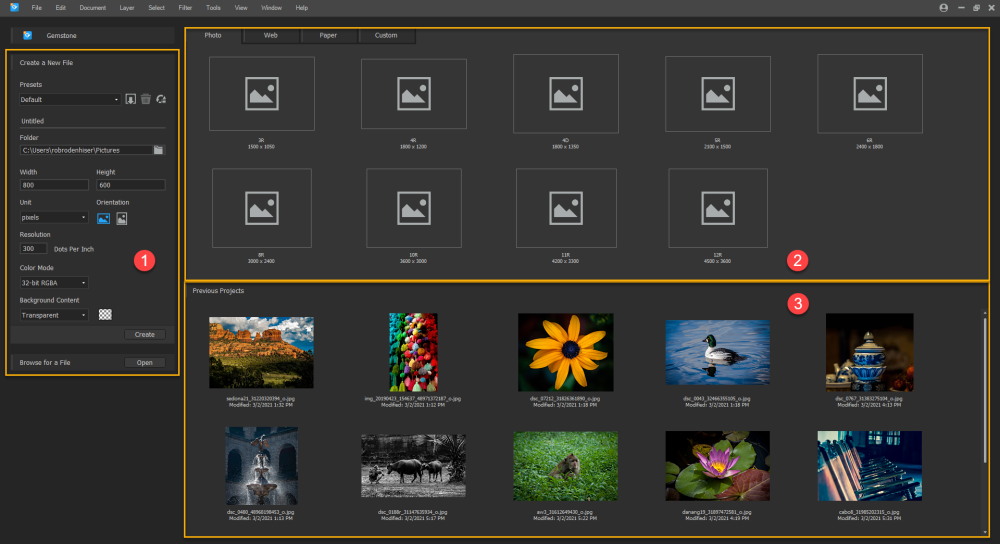
Create a New File Pane
The Create a New File pane occupies the left side of the Home Screen.
To create a new image:
- Optional: To populate the Create a New File pane with values based on templates, make a selection from the four tabs in the "Project Type" section: Photo, Web, Paper, and Custom.
- In the Create a New File pane, do one of the following:
- Use the default parameters,
- Select a preset, or
- Customize the image properties.
- Click the Create button to open the new image in the new Display Area screen.
To open an existing image that does not appear in the Previous Projects section, click the Open button in the Browse for a file bar to browse and select a pre-existing project.
| Presets | |
|
Presets |
Leave the Presets drop-down list set to "Default" to keep all of the settings applied to the Image field set. Or, select a preset from the drop-down list to accept a customized set of image parameters. |
|
|
Opens the New Preset dialog. Enter a name for the preset, then click the OK button to populate the new preset into the Preset drop-down list. The new preset will be constructed of the parameters set in the Image field set. It is recommended to complete any customizations in the Image field set before completing the New Preset dialog. |
|
|
Deletes a preset from the Preset drop-down list. |
| Image Field Set | |
|
Width |
Enter a value to determine the image width. |
|
Height |
Enter a value to determine the image height. |
|
Unit |
Make a selection from the drop-down menu to determine the unit of measurement for both the Width and Height fields. Options include: "Centimeters", "Inches", and "Pixels". |
|
Orientation |
Click the appropriate icon to specify the image's orientation, either Portrait or Landscape. |
|
Resolution |
Specifies the Dots Per Inch (DPI) of the image. The higher the DPI the better the image quality and the bigger the image's file size. |
|
Color Mode |
Specifies the image's color mode. Options include: "32-bit RGBA" and "64-bit RGBA". The higher the bit count the better the image quality and the bigger the image's file size. |
| Background Content | Make a selection from the drop-down menu to determine the composition of the image's background. Options include: "Black", "Custom", "Transparent", and "White". Another method for setting the background content is to use a Color Picker. |
Template/Presets Section
The Template/Presets pane is located directly above the Previous Projects pane and to the right of the Create a New File pane.
The Template/Presets pane contains four tabs:
Photo Tab
The Photos tab contains 9 default options as detailed in the table below.
| Photo Sizes | Resolution |
|---|---|
| 3R | 1500 x 1050 |
| 4R | 1800 x 1200 |
| 4D | 1800 x 1350 |
| 5R | 2100 x 1500 |
| 6R | 2400 x 1800 |
| 8R | 3000 x 2400 |
| 10R | 3600 x 3000 |
| 11R | 4200 x 3300 |
| 12R | 4500 x 3600 |
Web Tab
The Web tab contains 10 default options as detailed in the table below.
| Output Type | Resolution |
|---|---|
| HD 1080p | 1920 x 1080 |
| UHD 4k | 3840 x 2160 |
| Instagram Square | 1080 x 1080 |
| Instagram Portrait | 1080 x 1350 |
| Instagram Landscape | 1080 x 566 |
| Instagram Story | 1080 x 1920 |
| Facebook cover photo | 820 x 312 |
| Facebook newsfeed photo | 1200 x 1200 |
| YouTube Channel Cover | 2560 x 1440 |
| YouTube Thumbnail | 1280 x 720 |
Paper Tab
The Paper tab contains 23 default options as detailed in the table below.
| Output Type | Dimensions |
|---|---|
| Letter | 8.5 x 11 inches |
| Legal | 8.5 x 14 inches |
| Poster | 11 x 24 inches |
| A0 (letter) | 841 x 1189 mm |
| A1 | 594 x 841 mm |
| A2 | 420 x 594 mm |
| A3 | 297 x 420 mm |
| A4 | 210 x 297 mm |
| A5 | 148 x 210 mm |
| A6 | 105 x 148 mm |
| A7 | 74 x 105 mm |
| A8 | 52 x 74 mm |
| A9 | 37 x 52 mm |
| A10 | 26 x 37 mm |
| B2 | 500 x 707 mm |
| B3 | 353 x 500 mm |
| B4 | 250 x 353 mm |
| B5 | 176 x 250 mm |
| B6 | 125 x 176 mm |
| B7 | 88 x 125 mm |
| B8 | 62 x 88 mm |
| B9 | 44 x 62 mm |
| B10 | 31 x 44 mm |
Custom Tab
The Custom tab is populated with the Default setting, the Last Used (if different than the Default) and any custom designed presets created in the Create a New File pane's Presets field set.
To create a new Preset and populate it to the Custom tab:
- From the Home Screen, navigate to the Create a New File pane.
- Make adjustments to affect the file's storage location, dimensions, and resolution, color mode and background.
- In the Presets field set, click the adjacent
 icon to open the New Preset dialog.
 - Enter a name for the preset, then click the OK button. The new preset will populate to the Custom tab.
Previous Projects Section
The Previous Projects section is populated with files previously saved in Gemstone. Information related to the image resides below the image, including file name and last modified date and time.
To open an existing project:
To open an existing project, double-click the project thumbnail image to either open the file in ACDSee RAW or the Editor, depending on the file type.
To clear recent projects:
From the Home Screen, select File | Open Recent... | Clear Recent File List from the main menu.